


Tooli Operating Instructions
This is the source of truth for how to operate your Tooli G2.
- Assemble your Tooli - Watch the instructional video to ensure you assemble your Tooli correctly.
- Connect Tooli - To connect Tooli to power you will need to obtain an IEC C13 power lead, suitable for your wall socket type. You may already have a spare one lying around - it is the same type of power lead as is used with most desktop computers.
- Connect Tooli to your computer - Tooli comes complete with USB cable, connect the square end into the side of your Tooli control box, which is located at the back of the machine. Connect the other end to the USB drive of your computer.
- Switch Tooli on - The ON/OFF switch is located on the top of the control box at the back of the machine. We advise switching off the power adapter at the wall when not using Tooli. Power adapters continue to use electricity even when the device they power is switched off.
- Launch the Tooli Control app - On your computer double click the 'Tooli_Control.jar' file (or the shortcut you may have created). Find out how to download and install the app here.
- Establish communication - Select which com port your Tooli is allocated to. If you aren't sure - don't worry - you can just try each one until you connect succesfully.
- Seek Limits - Tooli's control system needs to find the machine limit. clicking 'Seek Limits', will instruct Tooli to move the gantry slowly toward the back of the work area, until the Y-axis limit switch is triggered. Next the toolhead carriage will move right, along the gantry until the X-axis limit switch is triggered. If a toolhead is installed, the toolhead slide mechanism will move upwards until the Z-axis limit switch is triggered. The seek limits proceedure is now complete, and Tooli's control system knows the bounds of the work area and the actual position of each axis..
- Get to know your Tooli - Once you have established a connection with your Tooli you will be in the main screen of the Tooli app. Now would be a good time to familiarise your self with the functions of the main screen.
Getting started
Attaching a toolhead
Toolheads are held in place by a dove-tail clamping system, which allows the vertical position of the toolhead to be varied. The vertical position at which to clamp the toolhead will depend on several factors. With the Airbrush toolhead, the vertical clamp position is determined by the width of spray required. The closer the airbrush is to the work surface, the narrower the spray width will be when it contacts the work surface. The vertical position for the Multitool toolhead, will be determined to some degree by the actual tool to be used.

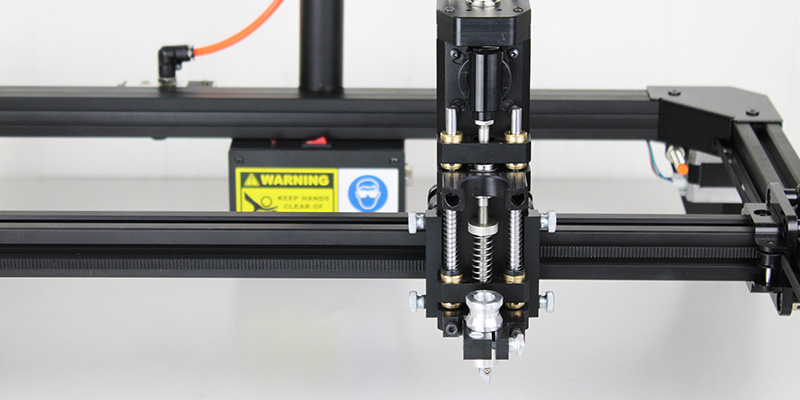
How the Multitool toolhead (MTT) works.
The MTT has a 10mm-stroke vertical slide mechanism, which is controlled by a small motor. The vertical movement of this slide mechanism is considered the ‘Z Axis’ by the control system. The slide can be automatically position at any point along the 10mm stroke. When the slide is fully up, it’s control position is 10mm. When the slide is fully down, it’s control position is 0mm.
Typically when running a job using the MTT the slide will be at 0mm when processing a shape, and at 10mm when moving between shapes. To help compensate for uneven work surfaces, and to provide different tool-tip pressures, the vertical slide mechanism is spring-loaded. The spring that provides downward pressure is located between the two slide rods on the MTT, and is adjustable in pressure by winding the knurled round nut at the top of the spring. Winding the nut down will shorten the spring, and therefore increase pressure.
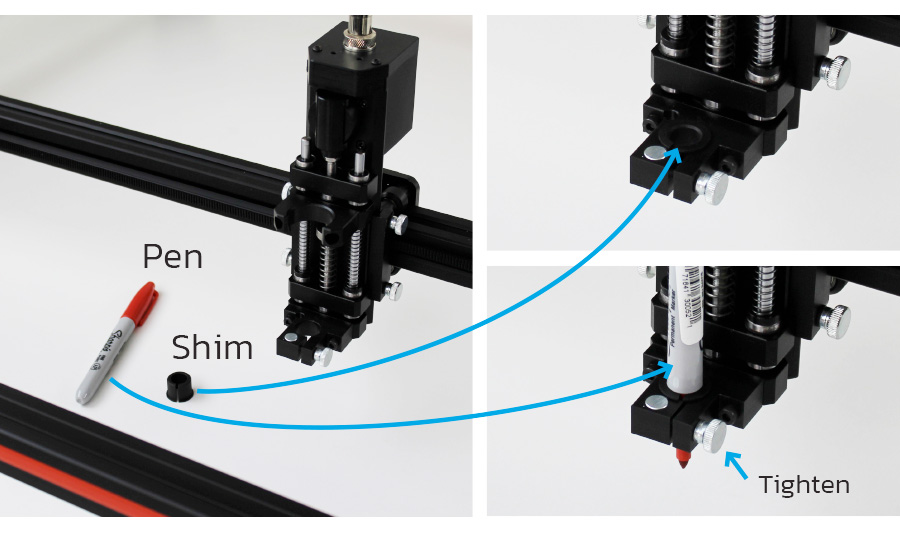
Using a marker pen as an example, to allow for an uneven work surface we need the pen tip to be able to move up and down slightly, so that it follows the surface. Lets say we want 1mm of float in both up and down directions. Before adjusting the vertical position of the MTT in the dove-tail clamp, we need to lower the slide mechanism to the 1mm control position. To do this the MTT must already be installed in the dove-tail clamp, Tooli must be powered on, and connected to the PC. Launch the Tooli Control app and seek limits, if you haven’t already done so.
In Tooli Control open the Multitool control screen, and move Z to 1mm. This will lower the MTT slide to 1mm from being fully down. With the marker pen clamped in the MTT tool holder, and the cap removed, loosen the dove-tail clamp thumbscrews – on one side only. Next lower the MTT down until the pen tip just touches the work surface, and lock the MTT in position by tightening the thumbscrews. Make sure during this procedure to support the weight of the MTT, and ensure you are not holding the sprung slide itself – holding the very top of the MTT works best. Now you can close the Multitool control screen in Tooli Control, and the slide will automatically move to the fully up position. You are now ready to draw with Tooli.
Tip: placing a piece of thin plastic (plastic shopping bag) between the pen tip and the work piece will prevent ink transferring to the work piece.
Some tools, such as the dispenser, don’t contact the work surface. In this case you would lower the Z to 0mm in Tooli Control, and lower the MTT to where the dispenser tip just touches the surface. Layer height control in Art2Gcode will provide the correct amount of offset.