
Got questions? visit the
Toolbotics Community Forum
To ceate toolpaths for your Toolbotics Tooli use the online application Art2Gcode to convert your SVG files to G-code.
Welcome
This is the source of truth for how to operate your Tooli.
If you wish to ask questions or view our Tooli community help click here.
If you just recieved your Tooli and need to assemle it watch our video on How to assemble your Tooli.

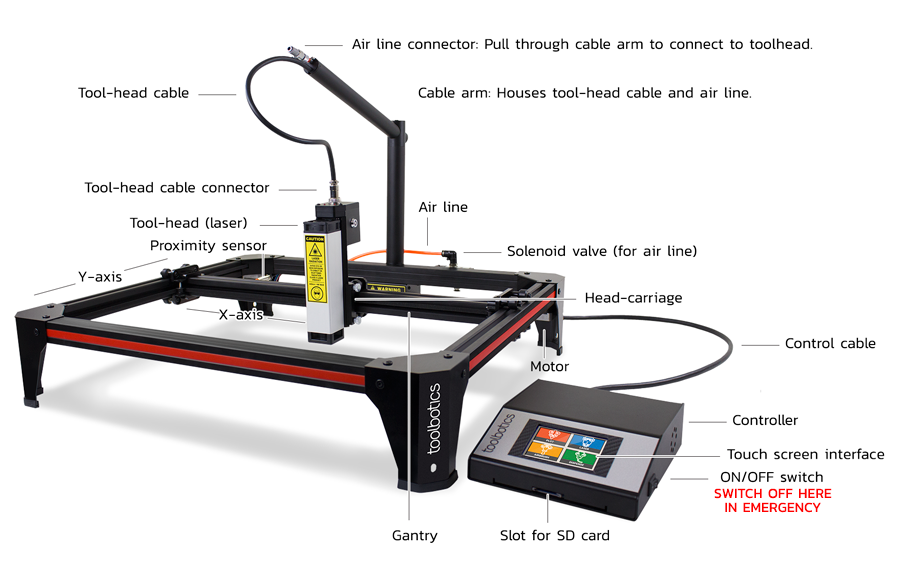
Anatomy of Tooli
Before running any jobs - get to know your Tooli. This diagram also demonstrates the nomenclature used throughout the help.
Switching Tooli on
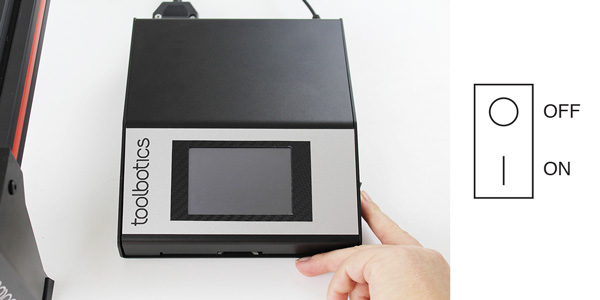
The ON/OFF switch is located on the side of the controller. Switch Tooli ON - a short animation will run while the controller starts up.
in case of emergency
Use the ON/OFF switch to shut down Tooli.
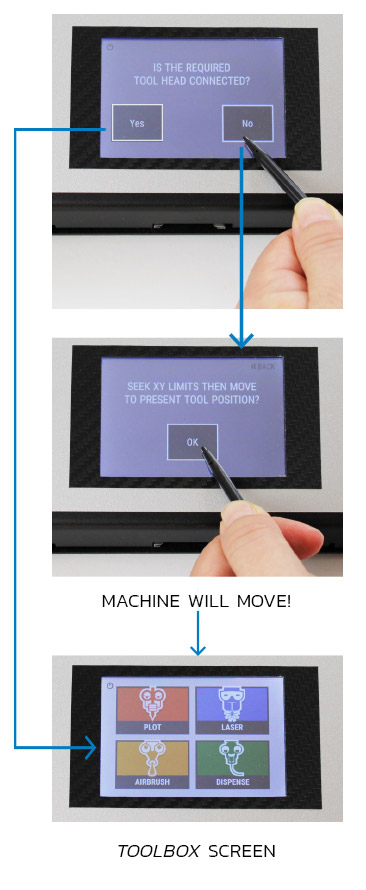
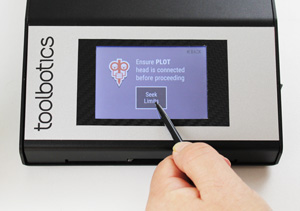
Is the required tool-head connected?
This is the first interaction screen you will see. Tooli needs to know if the required tool-head is connected before proceeding.
Tap Yes if the required tool-head is connected - the controller will proceed to the Toolbox screen.
Tap No if required tool-head is not connected - controller will prompt you to ‘seek xy limits then move to present tool-head position?’
Tap OK Tooli will move the head-carriage to back-right corner (slowly) until the limit switches are triggered, then it will move (faster) to the ‘present tool-head’ position (the 'present tool-head' position allows you to reach the head-carriage to connect the required tool-head).
The Toolbox Screen will display.
Before choosing your tool in the Toolbox screen - install the required tool-head.
This image shows the empty head-carriage in the ‘PRESENT TOOL-HEAD’ position.
Note: Tooli comes wth a deault setting for ‘PRESENT TOOL-HEAD’ this should be suitable in most cases. If you wish to change the default ‘PRESENT TOOL-HEAD’ positionyou can do so by going to ‘SETTINGS’. Change the X and Y coordinates in the ‘Present head coordinates’ screen.
(This will change the ‘PRESENT TOOL-HEAD’ postion for all tool-heads. It will also save the setting as default until you choose to change it again.)
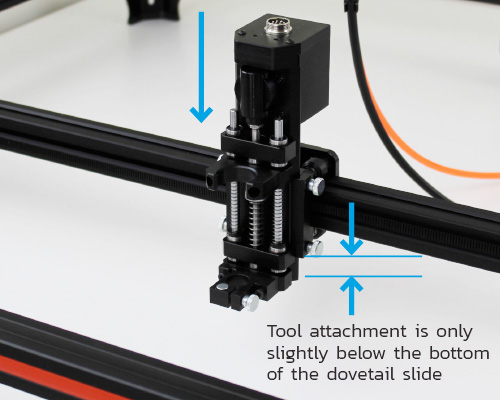
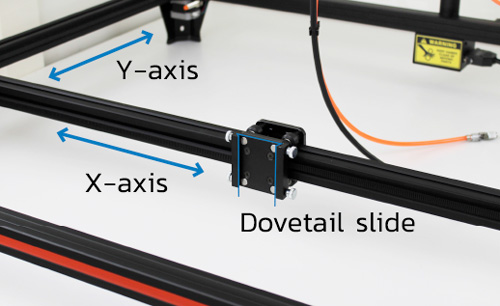
Slide tool-head into dovetail slide. At this point, leave the tool sitting quite high and tighten the thumbscrews to hold the tool-head in place.
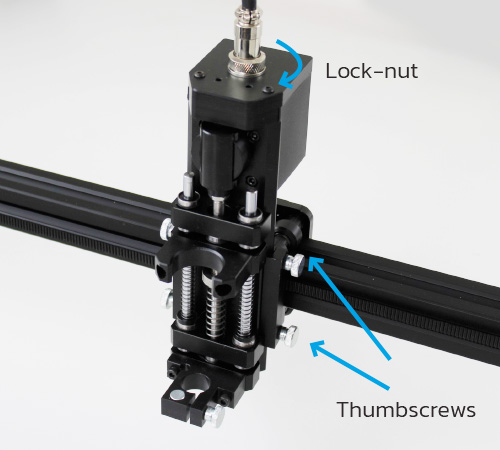
Attached the cable by inserting the plug into the socket on top of the tool-head and screw down the lock-nut (do not over-tighten).
Note: The plug and socket are shaped to only allow connection in one position so the pins align correctly. Do not force the plug into the socket.
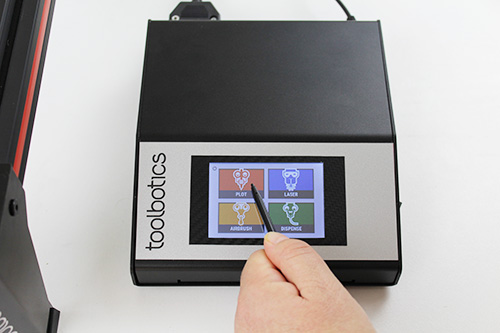
In the Toolbox screen tap the button for the tool-head you have connected.
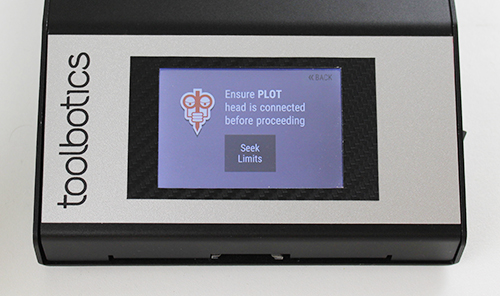
Tap Seek Limits to continue.
With the tool-head attached you can now tap Seek Limits - Tooli will move the head-carriage to back-right corner (slowly) until the limit switches are triggered. The head carriage will remain in this position at the end of the procedure.
You will then be taken to the home-screen for the chosen tool-head.
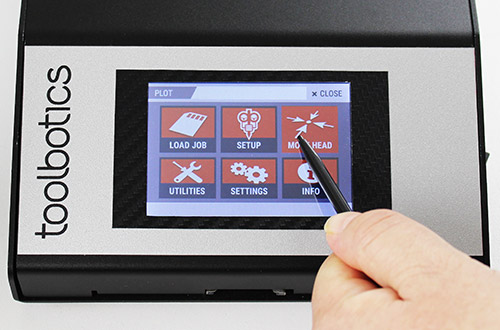
Tool home-screen
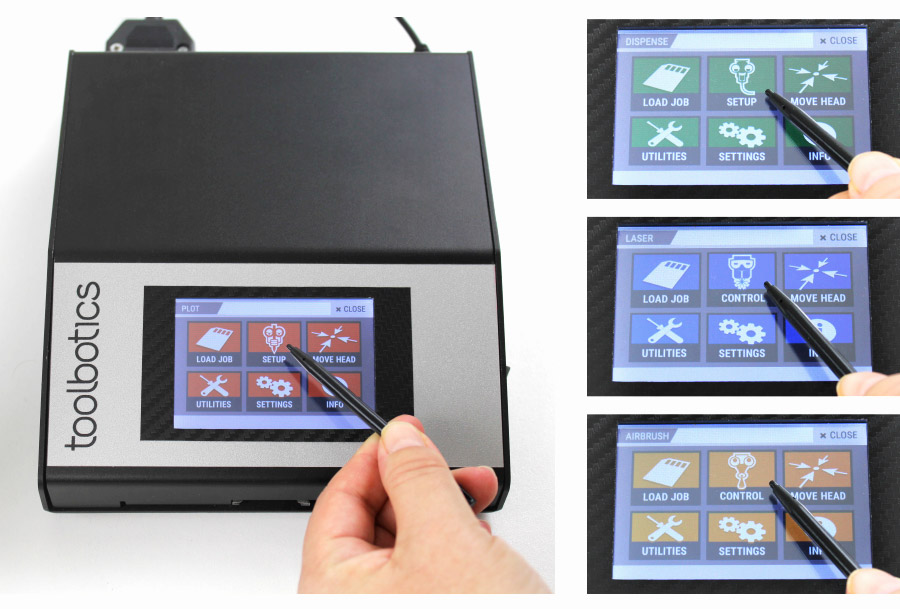
Each tool has a home screen with six buttons.
The top middle button contains the only tool-specific functions, ie ‘SETUP’ for the plotter and dispenser, or ‘CONTROL’ for the laser and airbrush. The other five buttons have the same functions regardless of which tool you are using.
For specific instruction on installing each tool head click on the tool you wish to use:


Moving the tool-head
The ‘MOVE HEAD' function allows you to move the tool-head around.
In the move head screen the ‘PRESENT HEAD’ button will move the head-carriage to the preset coordinate for ‘PRESENT-HEAD‘
The ‘PARK HEAD’ button will move the head-carriage to the preset coordinate for ‘PARK HEAD’ (default setting is the back-right corner).
Note: These presets are found in the ‘SETTINGS’ screen and can be customised.
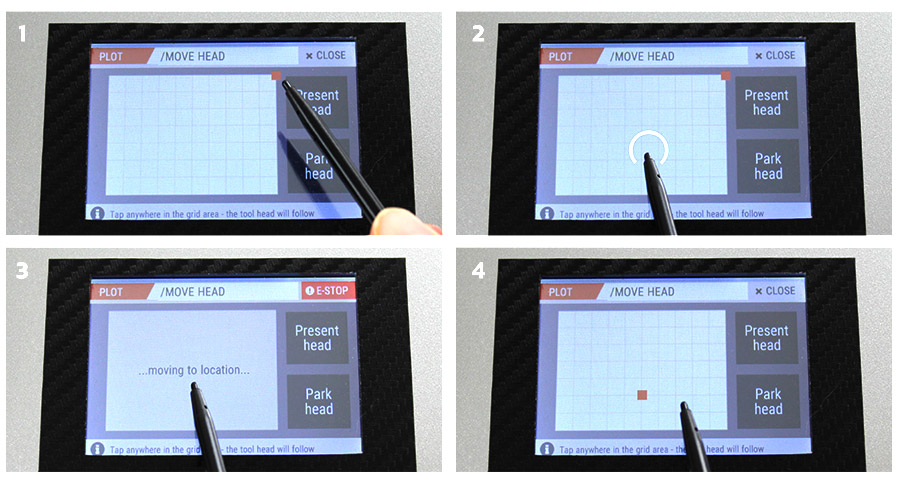
The move grid
You can move the head-carriage to any location simply by tapping in the grid area (imagine the grid area as if you are looking at Tooli from above and the grid area is the work area).
The orange square indicates current head-carriage position. Tap on the grid where you want the tool-head to move to - the head-carriage will move to that location. The orange square now indicates the new head-carriage location.
If you need to move the head-carriage to a precise location (coordinate) you will need to use the 'Move to coordinates' function found in 'UTILITIES'.
Running a job
Before running a job you will need to create your G-Code file in Art2GCode. You will also need to set up the machine with the tool-head and work surface you plan to use.
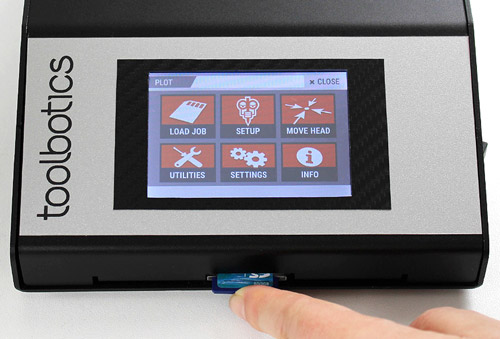
Copy the file onto a 2GB SD Card and insert into the control box.
Tap LOAD JOB.
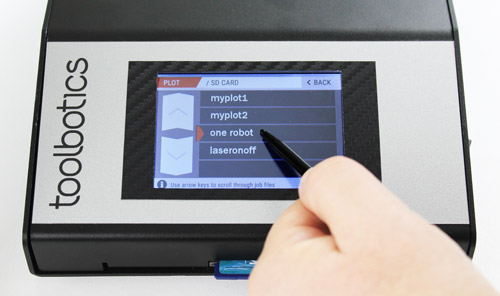
Use the arrows keys to scroll through jobs if necessary
Tap the job file you wish to run.
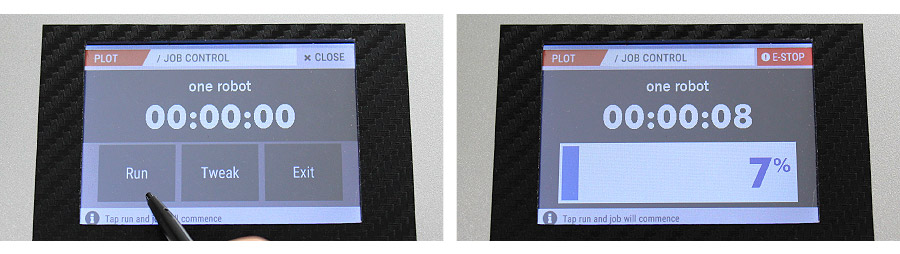
This will take you to the 'JOB CONTROL' screen.
To start the job tap Run - job will start (machine will move).
The screen will display a progress bar and timer while the job is running.
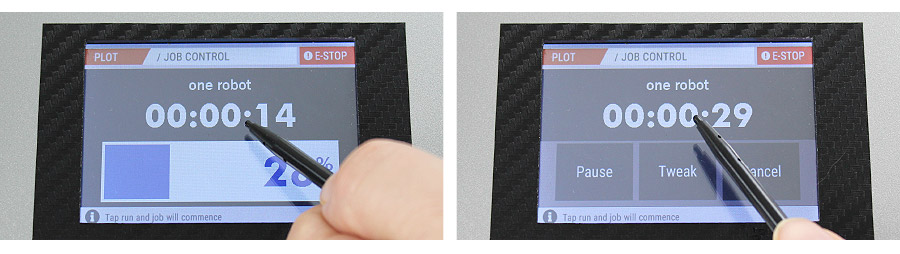
While the job is running you can tap on the time display (mid-screen) to reveal the ‘Pause’, ‘Tweak’ and ‘Cancel’ buttons.
Tap Pause to stop the job temporarily. Tap Resume to continue the job.
Tap Cancel to cancel the job completely.
To hide these option buttons tap on the time display (mid-screen).
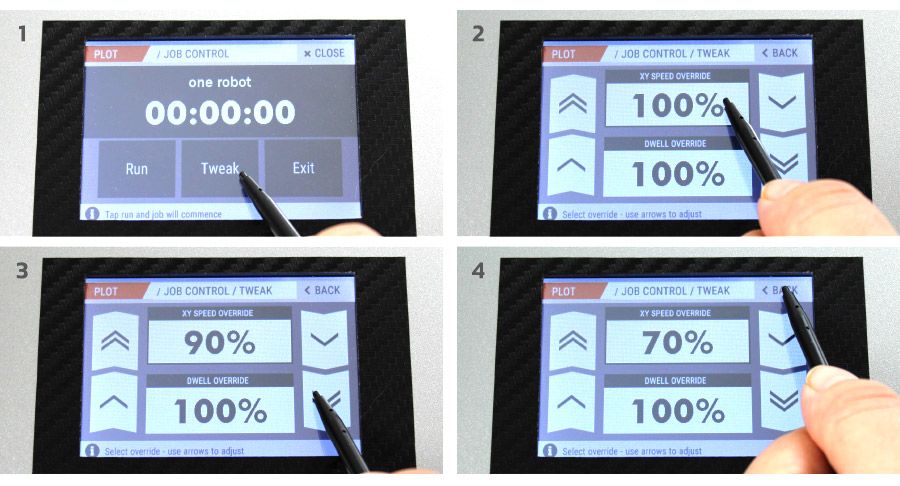
Tweaking a job
You may wish to make changes to a job while it is running. For example if you observe the job running and decide it would get a better result if it was moving faster - you can ‘Tweak’ the job. You can do this before you run the job or on-the-fly while it is moving.
While the job is running tap Tweak.
Select which setting you wish to override.
Use the arrow keys to adjust the settings. Double arrow adjusts in 10% increments, the single arrow 1% increments.
The machine will adjust while the job is running (ie will speed up or slow down).
When you are happy with the settings, tap Back to return to the job control screen.
Positioning the job
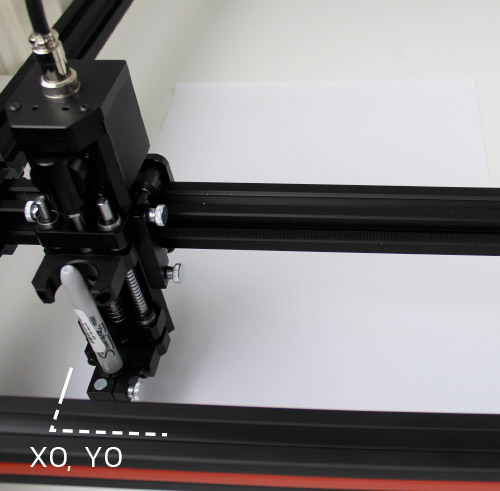
The default origin position is X0, Y0 ie the front left corner of the machine.
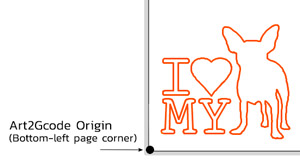
The origin position in Art2Gcode is aligned with the machine origin position.
The job will be positioned on the work area as it was positioned on the page in Art2Gcode.
See this example at Art2Gcode help.
You can offset the job by using the ‘CUSTOM ORIGIN’ function. This will reposition the job origin.
Align the front left corner your paper to X0, Y0 of your machine - or to the offset job position (if job offset is enabled).
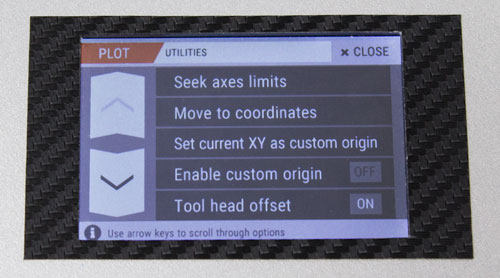

Utilities
The utilities contains a number of functions and commands to enable you to control Tooli.
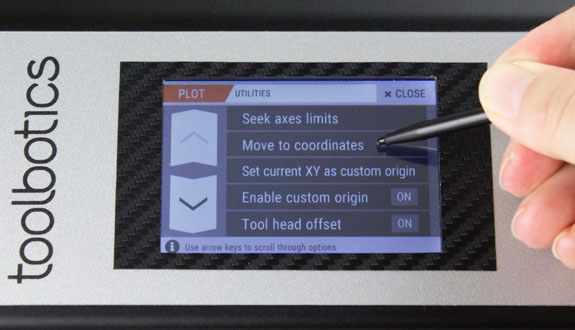
Seek axis limits
In case the head-carrige is bumped or moved manually, you need to have Tooli re-fined the axes limits. If the position of the head-carriage is changed without the control systems input, the control system may try to move the head-carriage outside the work envelope. This may result in damage to the machine. Whenever you beleive the gantry or head-carriage may have been manually moved, you need to 'SEEK AXES LIMITS'.
Move to coordinates
This will take you to the 'Move to coordinate' screen. There you can enter-in coordinates for precise positioning of the head-carriage.
Set current XY as CUSTOM ORIGIN
Use this to set the current head-carriage position as the custom origin. If 'CUSTOM ORIGIN' is enabled ('ON') then Tooli will reposition the job in the work area to use the current head-carriage position as the job origin. This position is saved as the 'Custom Origin'.
ENABLE CUSTOM ORIGIN
Toggles feature off and on. If the custom origin is OFF the job origin will be X0,Y0. If the custom origin is ON the job origin will be the saved 'CUSTOM ORIGIN'.
Tool-head offset
Toggles feature on and off. The tool-head offset allows for variation in tool-head center to head-carriage distance. The tool-head center is defined as the point at where the output occurs (the center of the Airbrush nozzle for example).The center point is different for each tool-head and therefore needs to be accounted for to ensure multi-tool jobs align correctly. Default tool-head offsets are pre-loaded. You can change tool-head offsets to allow for slight variations in tool-head center distance, in 'SETTINGS'.
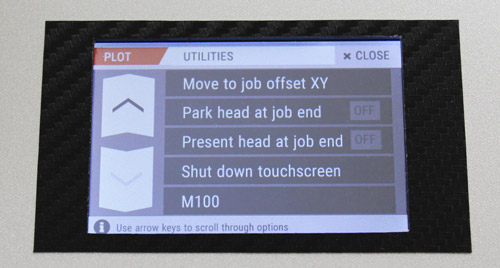
Move to job offset XY
This will move the head-carriage to the current job offset, if job offset is enabled (ON). If joboffset is disabled (OFF), the head-carriage will move to X0, Y0. This feature can be used to assist aligning the material on the work surface.
Park head at job end
Toggle feature on and off. When ON the head-carriage will move to the 'PARK HEAD' position when the job is complete. When OFF the head-carriage will remain in the position where the job ends.
Present head at job end
Toggle feature on and off. When ON the machine will move to the 'PRESENT HEAD' position when the job is complete. When OFF the head-carriage will remain in the position where the job ends.
Note: Only either 'Park head at job end' or 'Present head at job end' can be enabled (ON), not both at the same time.
Shut down touchscreen
Use this to shut down the touchscreen prior to powering off the controller. The touchscreen should always be shut down before the controller is turned off. This is a requirement for all LCD panels. You can get to the 'shut-downthe touchscreen function' by tapping the top left corner on any of the tool home screens.
M100
By default this has no function. It has been included in the touchscreen interface as a provision to allow for the addition of a custom function. The firmware of the controller will need to be updated for a new function to be added.
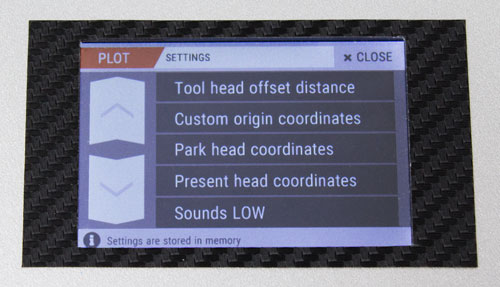

Settings
The setting contains a number of presets that can be changed. Select the setting you wish to change and you will be taken to the input data screen for that setting. Any changes made in settings will be saved to memory. Settings are recalled each time Tooli is switched on.
Tool-head offset distance
The tool-head offset ensures that each tool registers relative to the job origin, enabling you to make multi-tool creations. The tool-head offset allows for variation in tool-head center to head-carriage distance. The tool-head center is defined as the point at where the output occurs (the center of the Airbrush nozzle for example).The center point is different for each tool-head and therefore needs to be accounted for to ensure multi-tool jobs align correctly. This setting is tool-head specific and can only be changed when each tool-head is loaded. Typically you would only change the default settings to allow for manufacturing tolerances.
The default tool-head settings are:
Plotter: X0, Y0
Laser: X0, Y14.5
Airbrush: X0, Y21.75
Dispenser: X0, Y0
Custom origin
The custom origin is used to offset the job origin relative to the machine origin (X0, Y0). 'ENABLE CUSTOM ORIGIN' must be 'ON' in the utilities screen for the offset to be implemented.
Park head coordinates
This allows you to change the ‘PARK HEAD’ position to a specific location (coordinates). This is the position that the tool-head will move to when you tap PARK HEAD in the 'MOVE' screen, or on completion of a job if 'Park head at end of job' is ON. The default location for the 'PARK' postion is the back-right corner of the work area.
PRESENT head coordinates
This allows you to change the ‘PRESENT HEAD’ position to a specific location (coordinates). This is the position that the tool-head will move to when you tap PRESENT HEAD in the 'MOVE' screen or on completion of a job if 'Present head at end of job' is ON. The default location for 'PRESENT' postion is the centre near the front of the work area - so the tool-head is easy to reach.
Sounds
This allows you to change the sound volume for the touch screen (the noise it makes upon registering a tap). Tap to toggle volume high, low, or off.
Using the number-pad
In Utilities and Settings there are a number of operations that require the use of the number-pad to input coordinates and values.
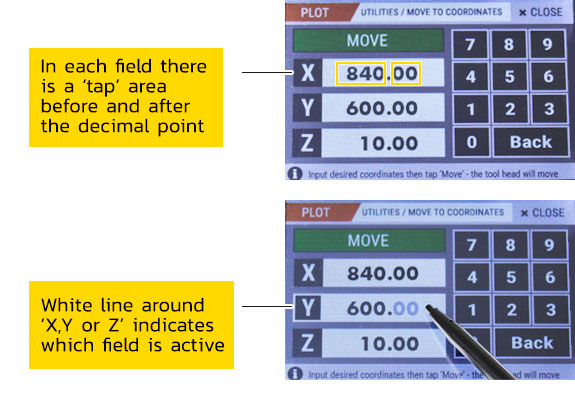
The example shown here is the 'Move to coordinates' screen in the utilities.
There is a axis field for each axis (X,Y and Z).
Within each axis field there are two 'tap' areas, one before the decimal point and one after the decimal point.
Tapping either of these areas will reset the value in that area to '0'.
Once selected - input the required value using the number-pad.
The back button is backspace.
Once you have input the desire coordinate tap MOVE - tool-head will move to the location you have entered.
Tap CLOSE to return to utilities.
Note: All keypad screen have an information message along the bottom of the screen with simple user instructions.
Switching Tooli OFF
It is best-practice to shutdown the touchscreen before switching off the controller. This is a requirement for all LCD panels.
You can access the 'Shut-down touchscreen' function by tapping the top left corner on any of the tool home screens. Alternately you may wish to access it in the utilities screen.
in case of emergency
Skip the touchscreen shut-down procedure and use the ON/OFF switch to shut down Tooli.